As you play Bioshock, you’ll find powerful upgrades called Plasmids. All of these powerful abilities grant you some type of combat advantage. Some are offensive while others are defensive. However, you can’t switch Plasmids through a menu or on the fly. You have to scour Rapture for specific vending machines first.
As you slice through splicers and security drones, you’ll pick up more Plasmids than you can equip at any given time. You’ll use them for combat, but also for accessing certain areas, or for finding a Little Sister or the game’s audio diaries.
Some locked doors can only be opened with a shot from Electro Bolt. Other times, a Plasmid like Hypnotize Big Daddy or Security Bullseye will get you past a particularly tough section.
Here’s what you need to know about equipping Plasmids whether you’re playing on PC, PS4, or Xbox One.
Switching Plasmids in BioShock
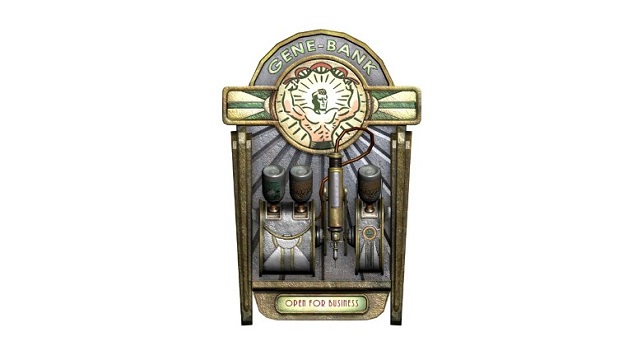
To switch the Plasmids that Jack has equipped, you’ll need to find a Gene-Bank machine. Gene-Banks look a lot like most of the other vending machines you’ll find throughout BioShock. However, Gene Banks feature a blond, muscled man holding up a strand of DNA over his head.
They look like this:
There are several Gene-Banks located throughout Rapture. Almost any time you encounter a group of vending machines you’ll find one. The first one most players encounter is in the Neptune’s Bounty area.
To switch Plasmids, simply approach the Gene Bank and interact with it. From the menu, select up to two Plasmids and which hand you’d like to equip them to. Once you’ve got your loadout picked, simply back out and relish in your new power!
As you move further into BioShock, you’ll also be able to upgrade your character and Plasmids, including the ability to have more than two equipped at once. These upgrades are purchased with ADAM, the currency you obtain from saving or harvesting Little Sisters.
You purchase these upgrades at the Gatherer’s Garden areas scattered throughout Rapture. Conveniently, Gene Banks and Gatherer’s Gardens are usually within close proximity to one another.
Bioshock Plasmid List
Here’s a list of all of the Plasmids in Bioshock, along with their effects, where you can find them, and how much ADAM they cost.
Cyclone Trap
This Plasmid creates a small cyclone as a trap, throwing enemies around an area. It can first be found in Arcadia for 60 ADAM.
Electro Bolt
This Plasmid uses electricity to shock enemies and open certain locked doors. It can be found in the Welcome to Rapture area for free. It is the first Plasmid you receive.
Enrage
Like crowd-control abilities in other games, this Plasmid makes affected enemies attack other enemies. It can first be found in the Medical Pavilion for 60 ADAM.
Hypnotize Big Daddy
This Plasmid causes Big Daddies to protect the player. It can first be acquired after saving three Little Sisters and speaking with Brigid Tenenbaum.
Incinerate!
This Plasmid does what it sounds like: it damages Splicers and other enemies over time with fire. It can be found in the Eternal Flame Crematorium. This is the second Plasmid you get.
Insect Swarm
This is also pretty on-the-nose and uses a swarm of insects to attack enemies. It can first be found in the Silverwing Apiary for 60 ADAM.
Security Bullseye
This Plasmid makes security drones attack enemies. It can first be found in Neptune’s Bounty for free, but it costs 60 ADAM otherwise.
Sonic Boom
This Plasmid uses supercharged air to knockback enemies. It can first be found in Neptune’s Bounty and Farmer’s Market for 40 ADAM.
Target Dummy
This Plasmid creates holograms of the player to distract enemies. It can first be found in Neptune’s Bounty.
Telekinesis
This lets players grab and throw objects. It can be found in Dandy Dental. It’s good for lobbing projectiles back at Nitro Splicers or Houdini Splicers. It can also pick up Big Daddy corpses.
Winter Blast
This Plasmid freezes targets for a short time. It can first be found in Neptune’s Bounty for 60 ADAM.
Little Sister Antidote
This does what it says and lets players rescue Little Sisters from Big Daddies. It is given by Brigid Tenenbaum.
—
That’s all you need to know on how to switch Plasmids in Bioshock. For more, including whether or not you should rescue Little Sisters, be sure to check out our other Bioshock guides.
- Common fixes for problems with The Bioshock Collection
- Spoiler-free starting tips for first time Bioshock players
- How to Find the Location of Chomper’s Dental Key
- How to Find and Get Rid of Infinite‘s Golden Guns
- Bioshock 2 Keycodes for Every Locked Door


Published: Feb 6, 2020 01:27 pm