
While there’s loads of combat, conversation options, and hidden items to be found in Divinity: Original Sin 2, the game goes a step further and throws in some puzzles that have to be solved by good old fashioned trial-and-error, rather than having a high stat or skill.
One of these puzzles has players consistently stumped if they don’t put all their abilities to use. When you reach Driftwood, there’s a seemingly unsolvable puzzle in the basement of Mordus’ house during the A Taste Of Freedom quest. Below we walk you through the solution, which requires a little ingenuity and a special Source power.
How to Solve the Divinity: Original Sin 2 Mordus Puzzle
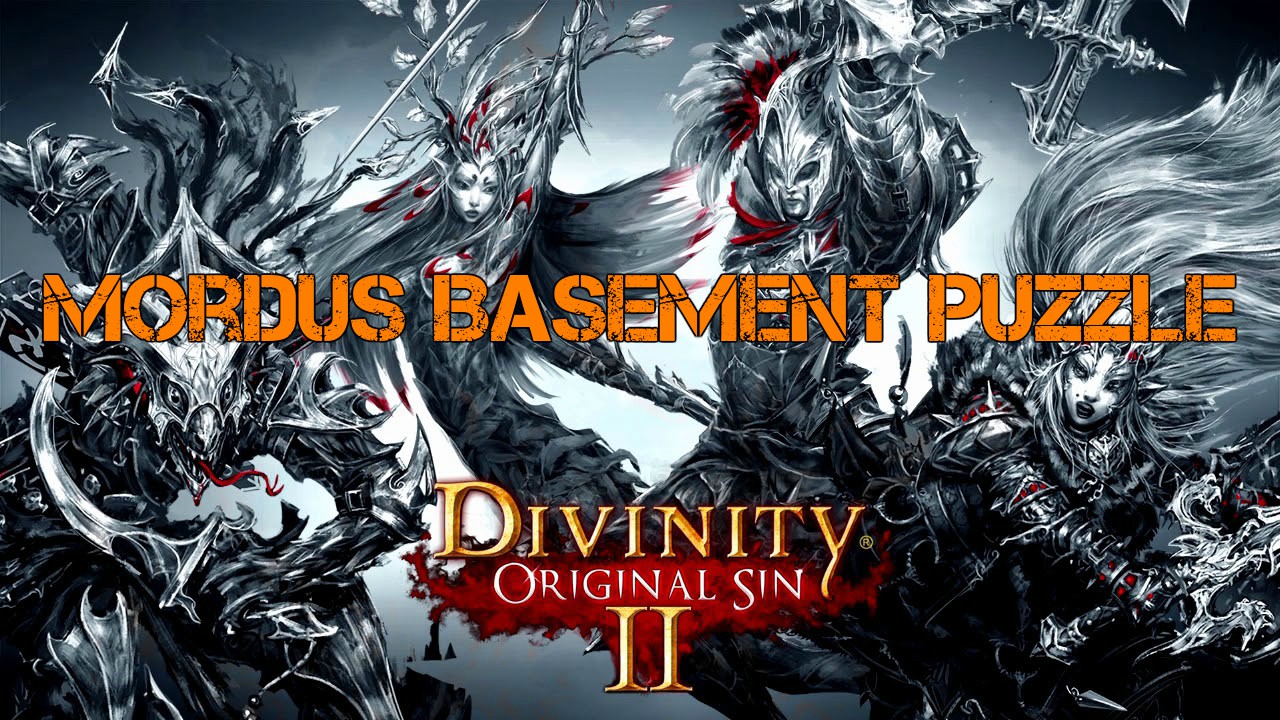
Eventually in Mordus’ basement, you come across a room covered in pressure plates and a door that can’t be opened. Clearly there’s a pattern where you need to stand on the plates — but unless you got lucky trying out dozens of random combinations, this one is next to impossible to figure out organically… until you activate Spirit Vision, which shows you the solution.
Spirit Vision is acquired during the main quest line and can’t be missed, so if you don’t have it yet while in the basement, go back and complete some storyline segments. While it counts as a Source power, it doesn’t cost any Source points to use, so it can be freely utilized for this puzzle.
A pattern of elemental images will appear over the pressure plates showing where you need specific plates to be pressed. The element for each plate changes based on where you are standing and how many plates are pressed.
For instance, if one person is standing on a plate, the nearby plates will be water. If two are standing next to each other, they will change to fire. If three are nearby, it will change to poison. You have to use that changing pattern to get the specific sequence of elements shown in front of the locked door.
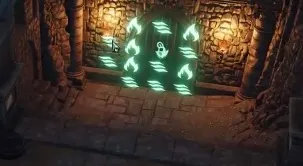 The pattern you are trying to mimic with pressure plates
Even with the elemental abilities highlighted in the air, there’s still a major catch though. You need to step on five pressure plates, but you can only have four characters in your party at any one time!
To get this puzzle solved and open the door, unchain your four characters and have them stand on each corresponding pressure plate. Then, set one of the big stone vases on the final spot, since you only have four characters but need to step on five plates. Alternatively, if you have enough heavy objects, you could just set them all on there and not unchain the group at all.
So how do you reach the correct mix of water, fire, and poison markers? The correct pattern (in the 4 X 4 pressure plate grid from left to right) is to place your characters or heavy objects on the spot marked “1” like this:
- 0010
- 0101
- 0100
- 0001
You can more clearly see what that means in the image below, showcasing the proper positioning of characters and vases. From top to bottom, it should be third position in the first row, second, and fourth position in the second row, second position in the third row, and fourth position in the fourth row.
You should clearly see the water, fire, and poison elements change to match the pattern in front of the door as you place characters/vases.
Once the puzzle is solved, its time to face a very ancient (and very hungry) lich — good luck!
If you’re looking for more Divinity: Original Sin 2 guides, be sure to check out our other tips and tricks for every aspect of this turn-based fantasy experience:
- Divinity Original Sin 2: Escaping Fort Joy
- Divinity Original Sin 2: Black Cat Secrets Revealed
- Divinity Original Sin 2: Character Creation Guide
- Divinity Original Sin 2: Best Lone Wolf Build
- Divinity Original Sin 2: Burning Pigs Guide


Published: Sep 22, 2017 02:07 pm